Manual for Ingenico ePayments and Concardis OXID Module

This documentation is illustrated by the example of Ingenico ePayments, but modules are identical for the mentioned provider. Accordingly, the manual also applies to all plugins. Please note the naming conventions (ingenico, ogone, payengine, paytool)
Module version: from 3.0
Shop version: OXID 4.7.x – 6.1.x
This manual shows you (on the example of the Ingenico ePayments module) step by step how to install the plugin to your online shop. Please test the installation and the configuration of the plugin on a test system before installing it on your live shop. If you have any questions don't hestitate to contact us.
- Inhaltsverzeichnis
- Manual for Ingenico ePayments and Concardis OXID Module
- Introduction
- Support
- Feature
- Installation
- Configuration
- Advanced template customization
- Updates
Introduction
Ingenico ePayments is the online and mobile commerce division of Ingenico Group. Ingenico connect merchants and consumers, enabling businesses everywhere to go further beyond today’s boundaries and creating the future of global commerce. As industry leaders since 1994, the innovative spirit drives them forward across all channels. Ingenico is the trusted partner of over 65,000 small and large merchants who rely on them to make payments easy and secure for their customers. With advanced data analytics, fraud management solutions and cross-border commerce expertise, Ingenico helps merchants to optimize their business and grow into new markets around the world. For more information, visit www.ingenico.com/epayments or follow at @Ingenico_ePymts.
The Ingenico ePayments-OXID module offers you the possibility to integrate various payment possibilities into your shop offered by the provider Ingenico ePayments and to offer each customer an individually selection of them.
The following payment methods are supported by the module:
- Credit carte
VISA
MasterCard
American Express
JCB - Diners Club
- Maestro
- PostFinance Card
- giropay
- Sofortüberweisung.de
- iDEAL
- PostFinance E-Finance
- eps Österreich
- Debit DE
- Debit NL
- PayPal
- mPass
- BillPay
- Mister Cash
If options, e.g. DirectLink are not activated, we would ask you to contact Ingenico for the activation.
NOTE: We already support the new mandatory 3D Security v.2 standard, or so called PSD2.
Support
For all support inquiries we ask you to tell us your Ingenico ePayments User ID.
The First-level support is taken over by Ingenico ePayments, the second-level support from mediaopt.
Please contact Ingenico ePayments first if you have any support inquiries. Ingenico will decide whether the request is passed on to mediaopt or processed in-house.
Pleace clarify the costs with Ingenico ePayments before submitting your request to mediaopt. Alternatively, mediaopt can provide you only a paid support. You will receive a short information about this in response to your inquiry.
For more information on Ingenico ePayments Support, please visit:
www.ingenico.com/epayments
Feature
From version 3.0 orders are created only after the payment process. Thus no orders will be created if the user cancel the payment process or the payment has been refused even though he has already confirmed the order in the shop. The advantage of this process is that the order overview contains only orders with payment confirmed by the customer.
Ingenico ePayments alias gateway technology allows One Page Check-out and offers maximal Usability to your customers. No storage of credit card data needed (PCI-DSS-Certification is required). Periodic maintenance included. The extension supports current OXID eShop versions from 4.5 for CE, PE and EE. The following languages are offered by the module: English, German, French, Dutch and Italian. The module supports both static and dynamic presets for the payment page layout.
Advantages:
- The module supports current OXID eShop versions from 4.5 for CE, PE and EE.
- The module offers following languages: English, German, French, Dutch and Italian.
- The module supports both static and dynamic presets for the payment page layout
- The module doesn't place any order if the payment has not been authorized.
Installation
Before you start with the installation process, backup your database and your online shop. If you have concerns about installing the plugin, let this job be done by a professional, or feel free to contact us for help. This module was developed for the OXID shop editions CE, PE, EE under the o.g. Versions. Please, follow this instruction carefully for an undisturbed use. If there is any ambiguity in the installation instructions, we are looking forward to your feedback (info@mediaopt.de).
Copy files
- Establish a connection to your web server e.g. via FTP
- Copy the content of the copy_this-directory to your shop root-directory
- If you are using a different OXID theme than Azure, please copy the content of the copy_this / out / azure theme directory to the directory of your active theme. If necessary, migrate the extended blocks under _ / modules / mo_ogone / out / blocks_.
Template blocks
The module contains the necessary template files to be operated with the Azure theme. Customized themes based on this theme can also be used.
Azure theme and themes, based on the Azure theme
When copying the files, all required template files were copied to the directory / out / azure and the module can be used with the Azure theme.
If you are using a customized theme based on the Azure theme, copy the contents of the / copy_this / out / azure / directory to the directory of your theme. Enterprise customer with sub-shops copy the files into the directory of the subshop's sub-theme with which you want to use the module.
Admin theme extension
To display the payment status in the order overview, copy the contents of the folder changed_full / out / admin into the directory / out / admin of your shop. If you have adapted the file which has to be replaced, integrate the Ingenico / Ogone / Concardis / Acceptance block as described in the file supplied with the module.
Bootstrap integrate
Add the following command to functions.php in the modules folder:
Igenico:
include __DIR__ . "/mo/mo_ingenico/bootstrap.php";
Ogone:
include __DIR__ . "/mo/mo_ogone/bootstrap.php";
PayEngine
include __DIR__ . "/mo/mo_payengine/bootstrap.php";
PayTool
include __DIR__ . "/mo/mo_paytool/bootstrap.php";
Modul activation
Log in to the administration area and activate the module (Extensions> Modules> Ingenico / Ogone / Concardis / Acceptance).
Write Persmissions for the log file
Create the file / log / mo_ogone.log and make sure that the file has write permissions (e.g., 777). The file permissions can include With an FTP tool.
Cache clearify
Delete php & .txt data from tmp/ directory. Don't delete .htaccess.
Configuration
Configuration at the shop backend
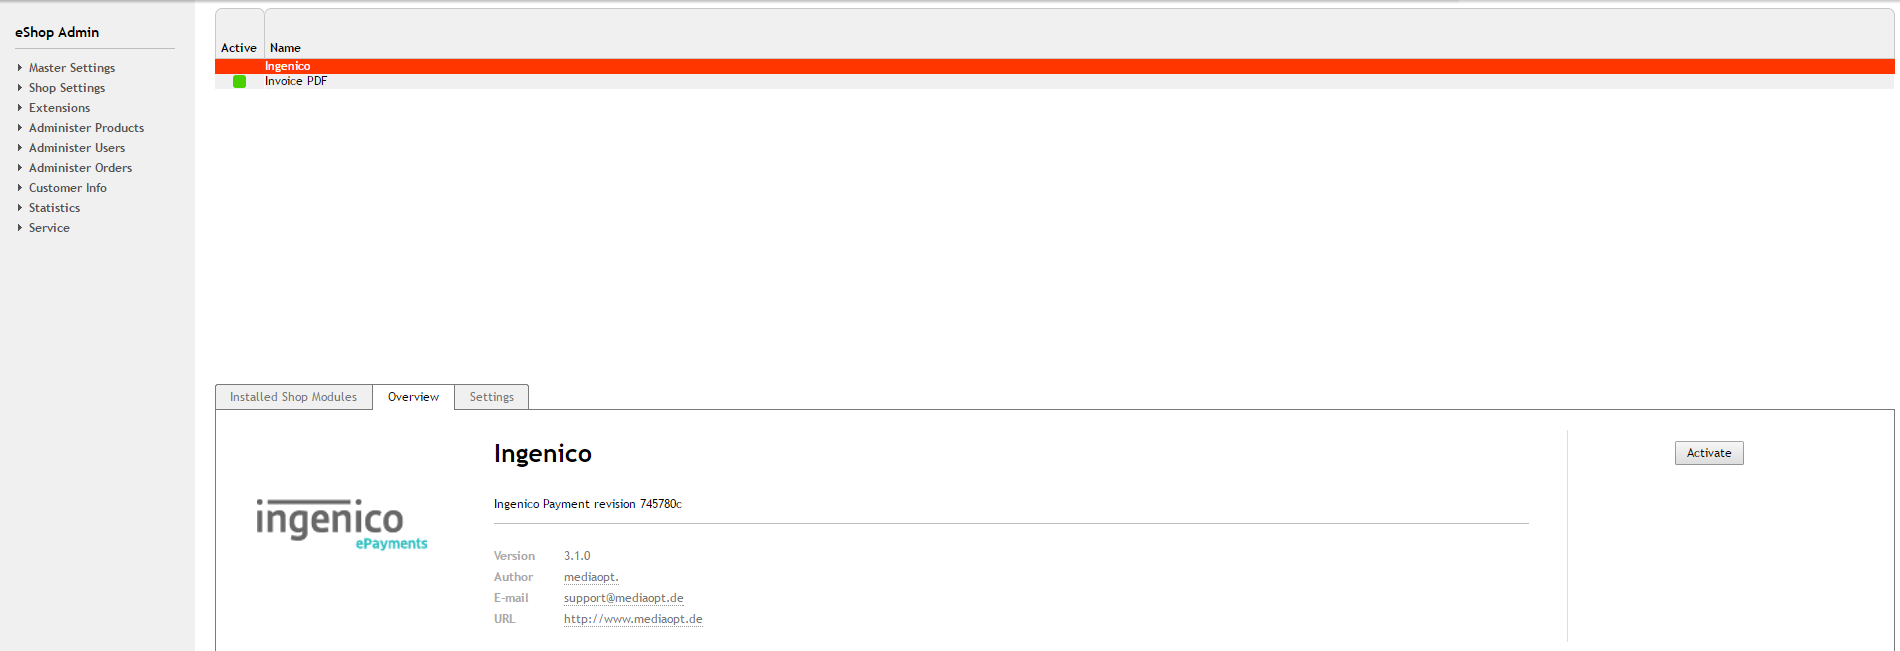
Reload the OXID-Shop administration page. There is now a new menu item (Ingenico / Ogone / Concardis / Acceptance) on the left. The sub-item Status messages shows an overview of all transactions made via Ingenico / Ogone / Acceptance / Concardis. Log displays the contents of the log file.
Under Settings (Ingenico / Ogone / Acceptance / Concardis> Settings), the module can be initialized and configured. Please enter your data into the fields provided for this purpose.
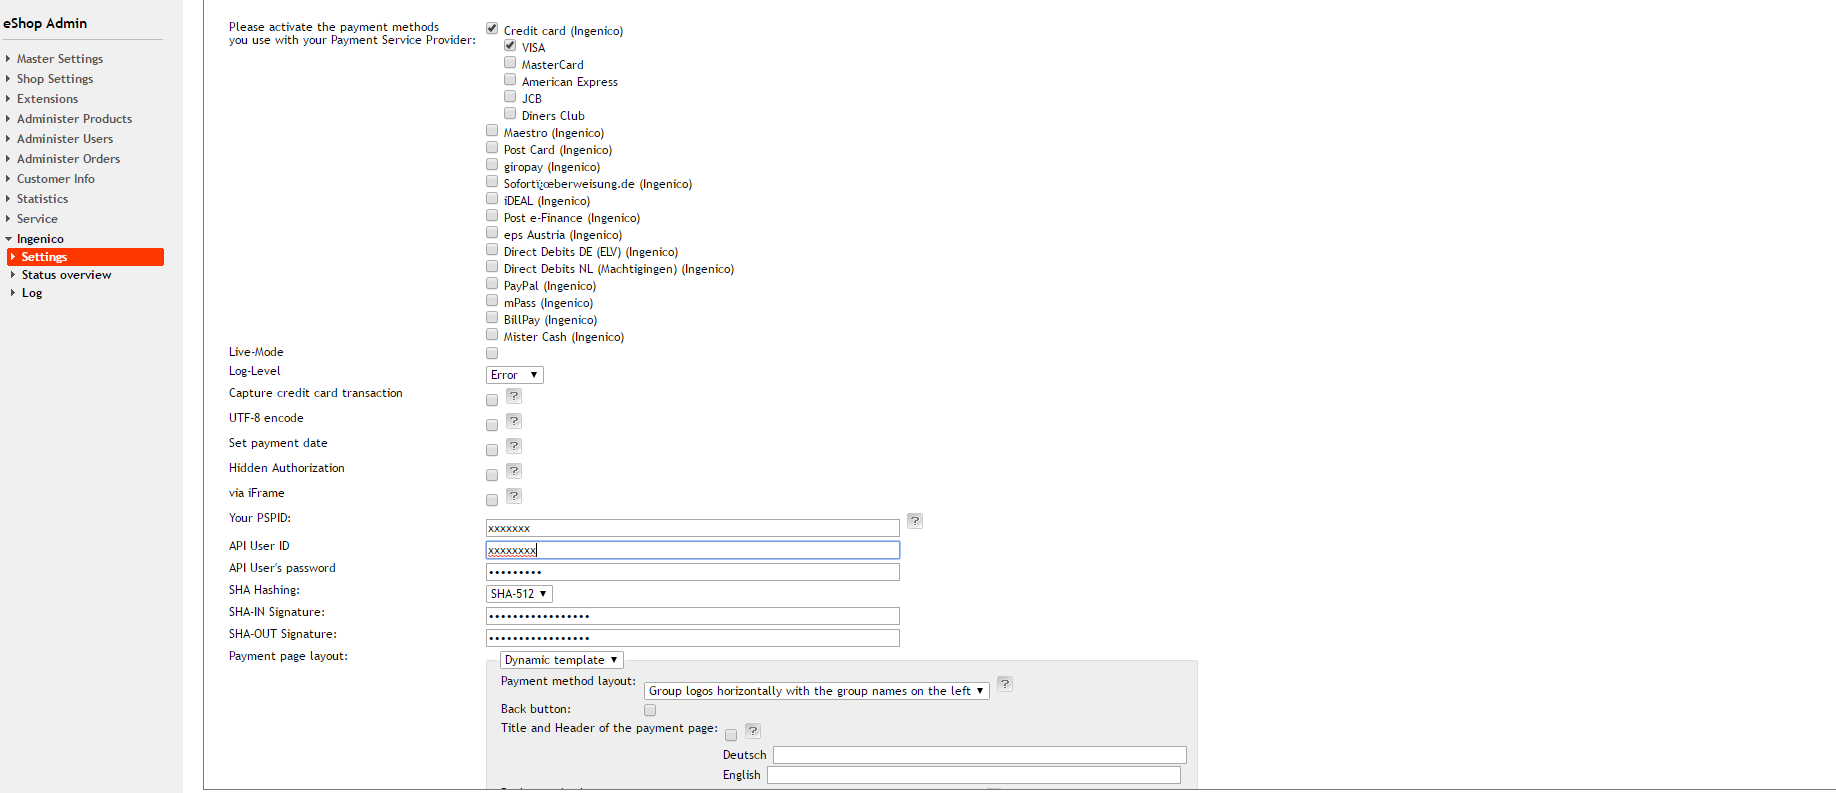
Make sure that the encryption method SHA is the same as the encryption method used in the Ingenico / Ogone / Concardis / Acceptance backend encryption method. You should also use the identical SHA-IN and SHA-OUT signature in your shop, which you can find in the Ingenico / Ogone / Concardis / Acceptance Backend
Configuration> Technical Information> Data and origin verification (see Data and origin verification) or Transaction Feedback (see Transaction feedback)
The shop provider can decide whether and how Hidden Authorization should be used for credit cards. The following options are available:
| no Hidden Authorization | Also called redirect. The customer is forwarded to the payment service provider's side to enter his credit card information. |
| Hidden Authorization with JavaScript | The customer enters his credit card information directly into a form on the shop page which will be then forwarded to the Payment Service Providers and the shop alias data for which the subsequent payment is made available. (Requires PCI certificate from the shopkeeper) |
| Hidden Authorization with iFrame | The customer enters his credit card information in an iFrame of the Payment Service Provider on the shop page which will be then forwarded to the Payment Service Providers and the shop alias data for which the subsequent payment is made available. |
Change to Shop Settings > Payment Methods. Here the payment methods can be configurate, activate and rename (e.g. Credit Card Ingenico/Ogone/Concardis/Acceptance to Credit Card).

Assign User Groups for which the payment method should be available. The countries has also to be assigned in the same way. If no groups or countries are assigned, the respective payment type is available to all users (also not logged-in users) or countries.
In the last step, assign the previously configured payment methods to the appropriate shipping methods under Shop Settings > Shipping Methods. This step is essential because the payment methods are not displayed otherwise.
Configuration in Ingenico/Ogone/Concardis/Acceptance backend
Settings for a sandbox account of Ingenico* will be done on https://secure.ogone.com/Ncol/Test/BackOffice/login/. For the production Ingenico* account use https://secure.ogone.com/Ncol/Test/BackOffice/login/.
The settings will be done on Configuration > Technical Information. Perform the settings on the basis of the illustrations.
Global transaction parameters
![]()
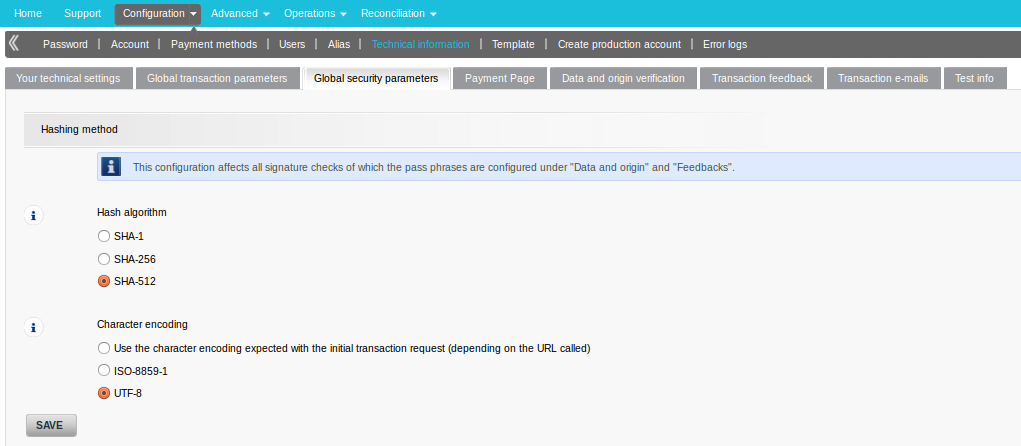
Global security parameters
It is recommended to use SHA-512 hashing and ISO character encoding. The specified hash algorithm must correspond to the one entered in the admin area of the OXID module (see Configuration at the shop backend).
Data and origin verification

Choose your SHA-IN pass phrase and use the same SHA-IN in the Ingenico/Concardis/ Ogone/Acceptance module on the OXID backend (see Configuration at the shop backend). Enter in the field "URL of the merchant page, ..." your shop URL.
Transaction feedback
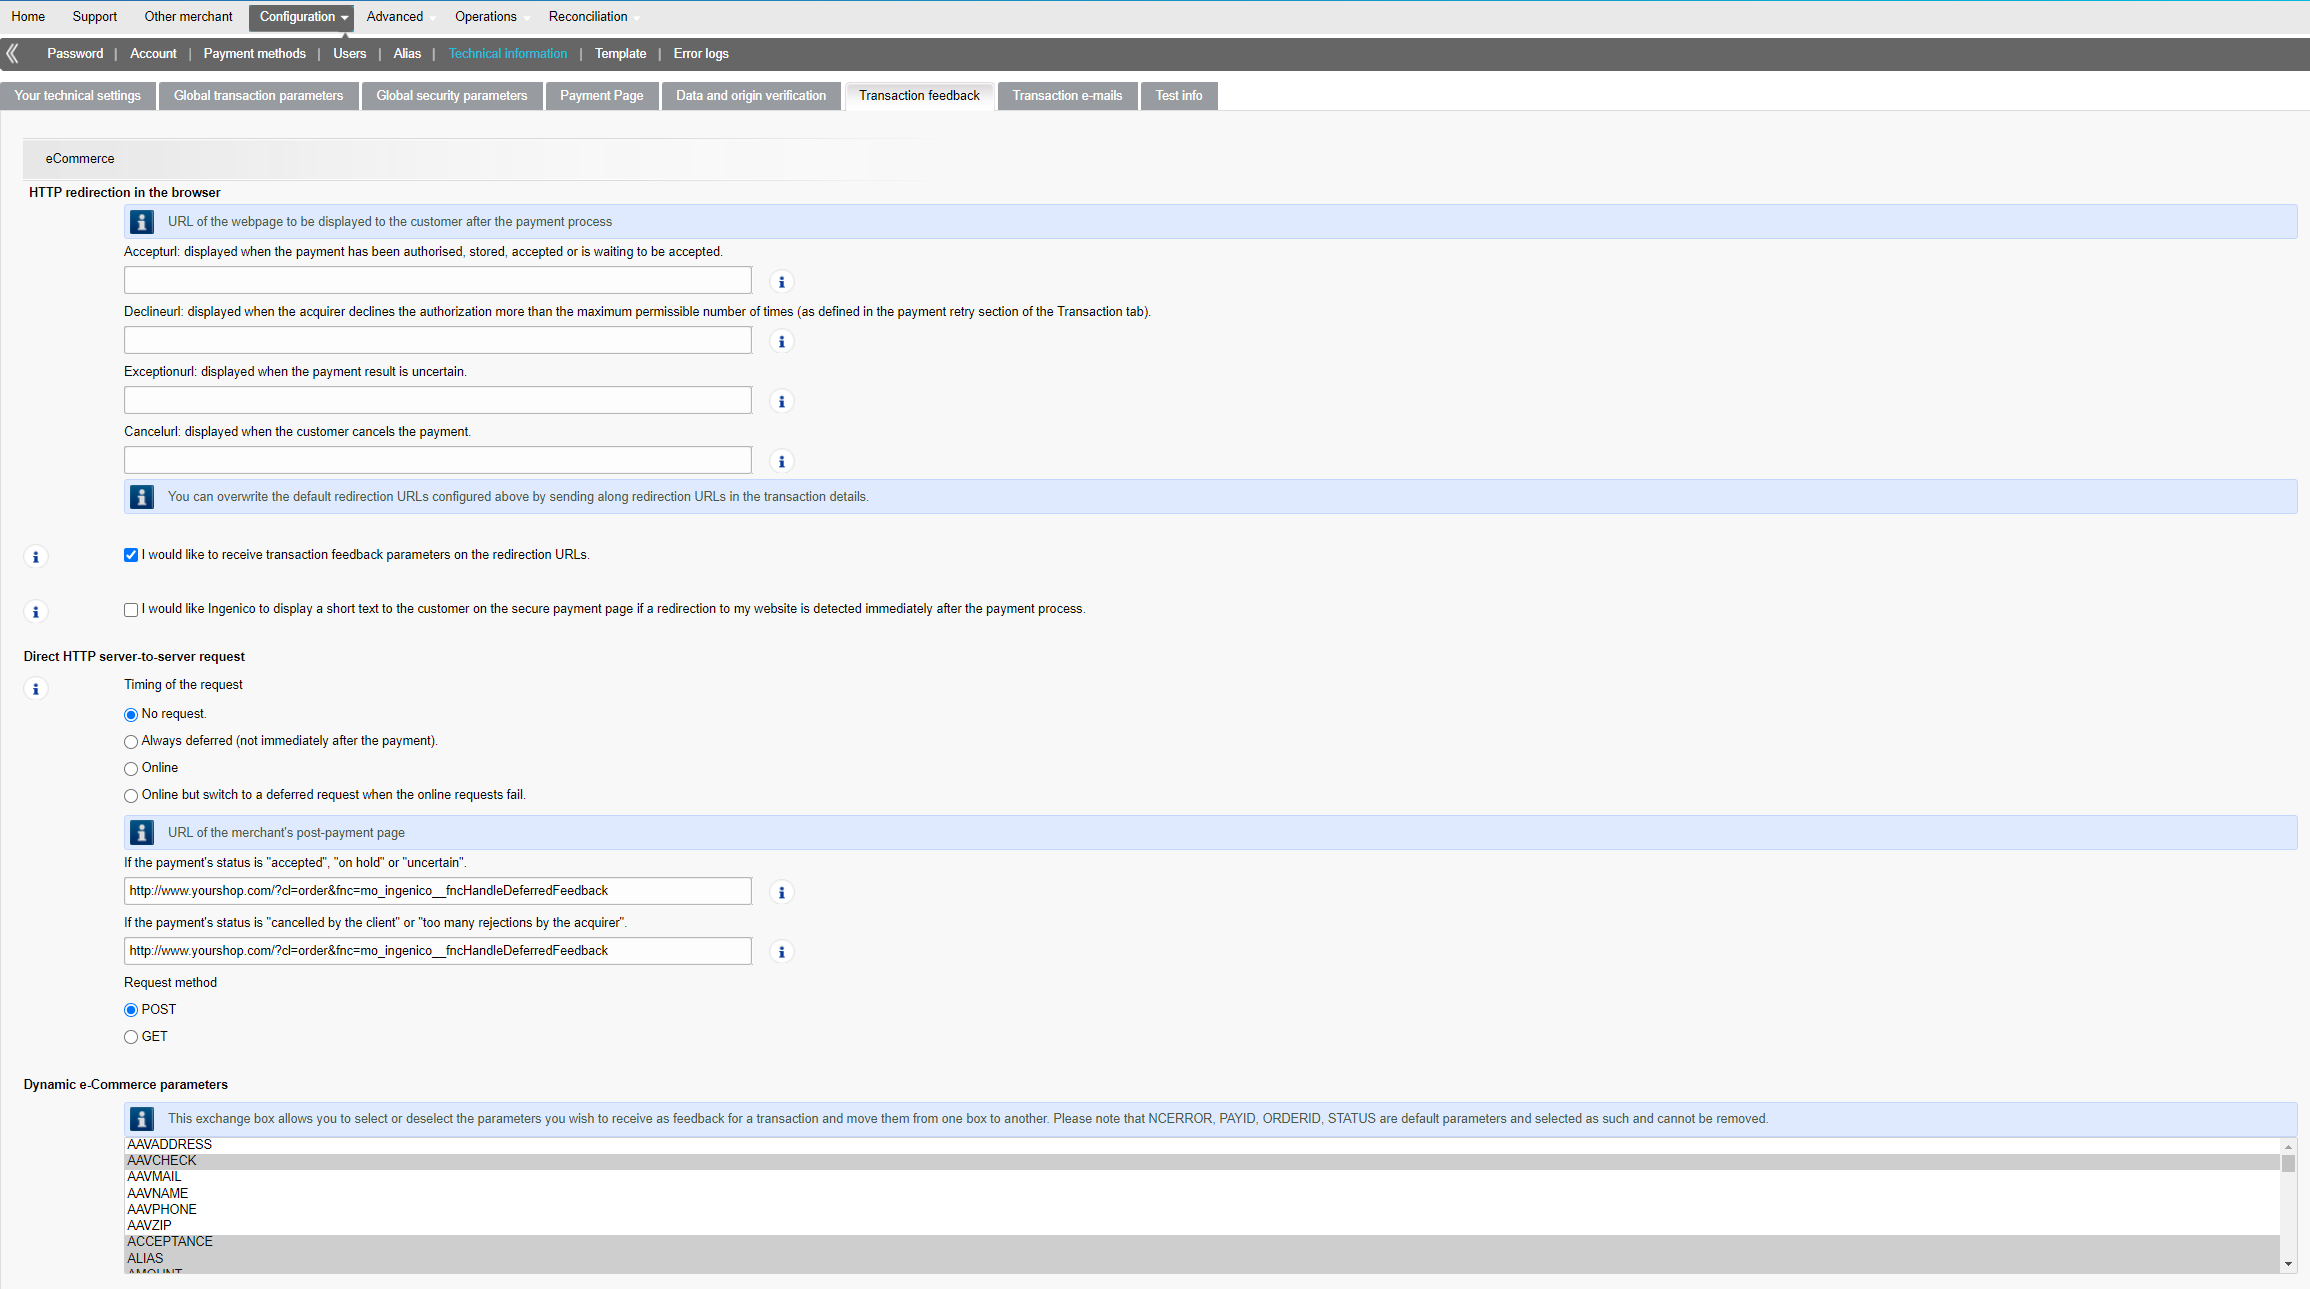
Please enter the URLs for the feedback in the corresponding fields as in the example. These result from their shop URL in the following form: http://www.yourshop.com/?cl=order&fnc=mo_ingenico__fncHandleDeferredFeedback
In Case ot the PayEngine module replace mo_ingenico__fncHandleDeferredFeedback by mo_payen__fncHandleDeferredFeedback.
In Case ot the PayTool module replace mo_ingenico__fncHandleDeferredFeedback by mo_ptool__fncHandleDeferredFeedback.
Choose your SHA-OUT pass phrase and use the same value for the plugin on the OXID backend (see Configuration at the shop backend).
We suggest to select these dynamic parameters for "Dynamische e-Commerce parameter" und Dynamic parameters
'AAVCHECK', 'ACCEPTANCE', 'ALIAS', 'AMOUNT', 'BRAND', 'CARDNO', 'CCCTY', 'CN', 'CURRENCY', 'CVCCHECK', 'ECI', 'ED', 'IP', 'IPCTY', 'NCERROR', 'NCERRORPLUS', 'NCSTATUS', 'ORDERID', 'PAYID', 'PM', 'STATUS', 'TRXDATE', 'VC'.
![]()
![]()
Advanced template customization
Several files are provided for the Azure Theme. The following table provides an overview about the function of each file:
| file | function |
|---|---|
| modules/mo_ingenico/views/azure/tpl/page/mo_ingenico/dynamic.tpl | dynamic template |
| modules/mo_ingenico/views/azure/tpl/page/mo_ingenico/payment_form.tpl | redirect site |
| modules/mo_ingenico/views/azure/tpl/page/mo_ingenico/order_error.tpl | error site |
| modules/mo_ingenico/views/azure/tpl/page/checkout/ mo_ingenico__payment_one_page.tpl | Credit card forms for users without javascript |
| modules/mo_ingenico/views/azure/tpl/page/checkout/inc/mo_ingenico__payment_creditcard.tpl | Single credit card form |
| modules/mo_ingenico/views/azure/tpl/page/checkout/inc/mo_ingenico__payment_creditcard_form_fields.tpl | Form fields in credit card form |
| out/azure/src/css/mo_ingenico.css | Change the style for the dynamic template and redirect site |
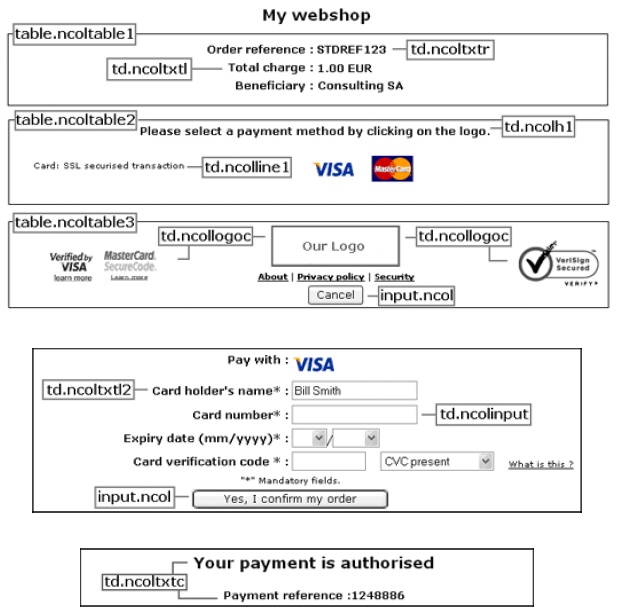
You can change the files to fit them into your shop design. The following graphic serves as a guide for the adaptation of the dynamic template and the forwarding page:
Updates
For an update, proceed as follows:
1. Create a backup (as with the installation).
2. Copy the new data to the store and overwrite the existing files upon request.
3. Follow the instructions in the installation guide for files from the changed_full folder..
for versionen from 4.6:
4. After the copying process, check whether the module is still active. Disable the module and enable it again.
Or
for versionen under 4.6::
4.The bundle contains the file mapping.txt, where all extensions of OXID classes are entered.
Match the extensions in the backend under Master Settings> Core Settings> System> extensions.
5. Empty the cache.