User Manual for Worldline Online Payments Shopware 6 Plugin
![]()
Shopware 6 versions: from 6.1.0.0
Plugin version: 2.1.5
Plugin language : English / ...
This manual shows you step by step how to install the plugin into your online shop. Please test the installation and the configuration of the plugin on a test system before installing it in your live shop.
About the Plugin
This Worldline ePayments Shopware 6 plugin provides an opportunity to handle all payment methods, which are offered by Worldline ePayments.
There are two default plugin flows of making a Worldline transaction:
- Full redirect (one shop payment method for all Worldline payment methods)
- Single payment (available payment methods will be loaded via an API connection with Worldline and will be stored as separate shop payment methods)
Functionality of the plugin covers following basic features:
- Secure payment in your online shop for your clients
- Full support of all available Worldline payment methods, including those that require line items (Klarna, Oney)
- MOTO (Mail Order Telefone Order)
- Transaction status check, payment capture, refunds, cancellations all possible to make by the merchant directly from the Shopware Backend
- All transaction operations can be done partially if the payment method in question supports them
- Worldline webhook guarantees that the changes made to a Worldline transaction in the Worldline Backoffice will be transmitted to the shop automatically
- a Worldline plugin cron-job allows you to automate the processing of a large number of payments and specify them to your needs
For reference to the supported Worldline payment methods see: https://epayments.developer-ingenico.com/payment-methods/view-by-country/
For all questions regarding your Worldline account see: https://epayments-support.ingenico.com/en/get-started/account-management/use-your-account
Plugin Installation
Before you start with the installation process, backup your database and your online shop. If you have concerns about installing the plugin, let this job be done by a professional, or feel free to contact us for help. Please, follow this instruction carefully for an undisturbed use.
- Log in to your shop backend.
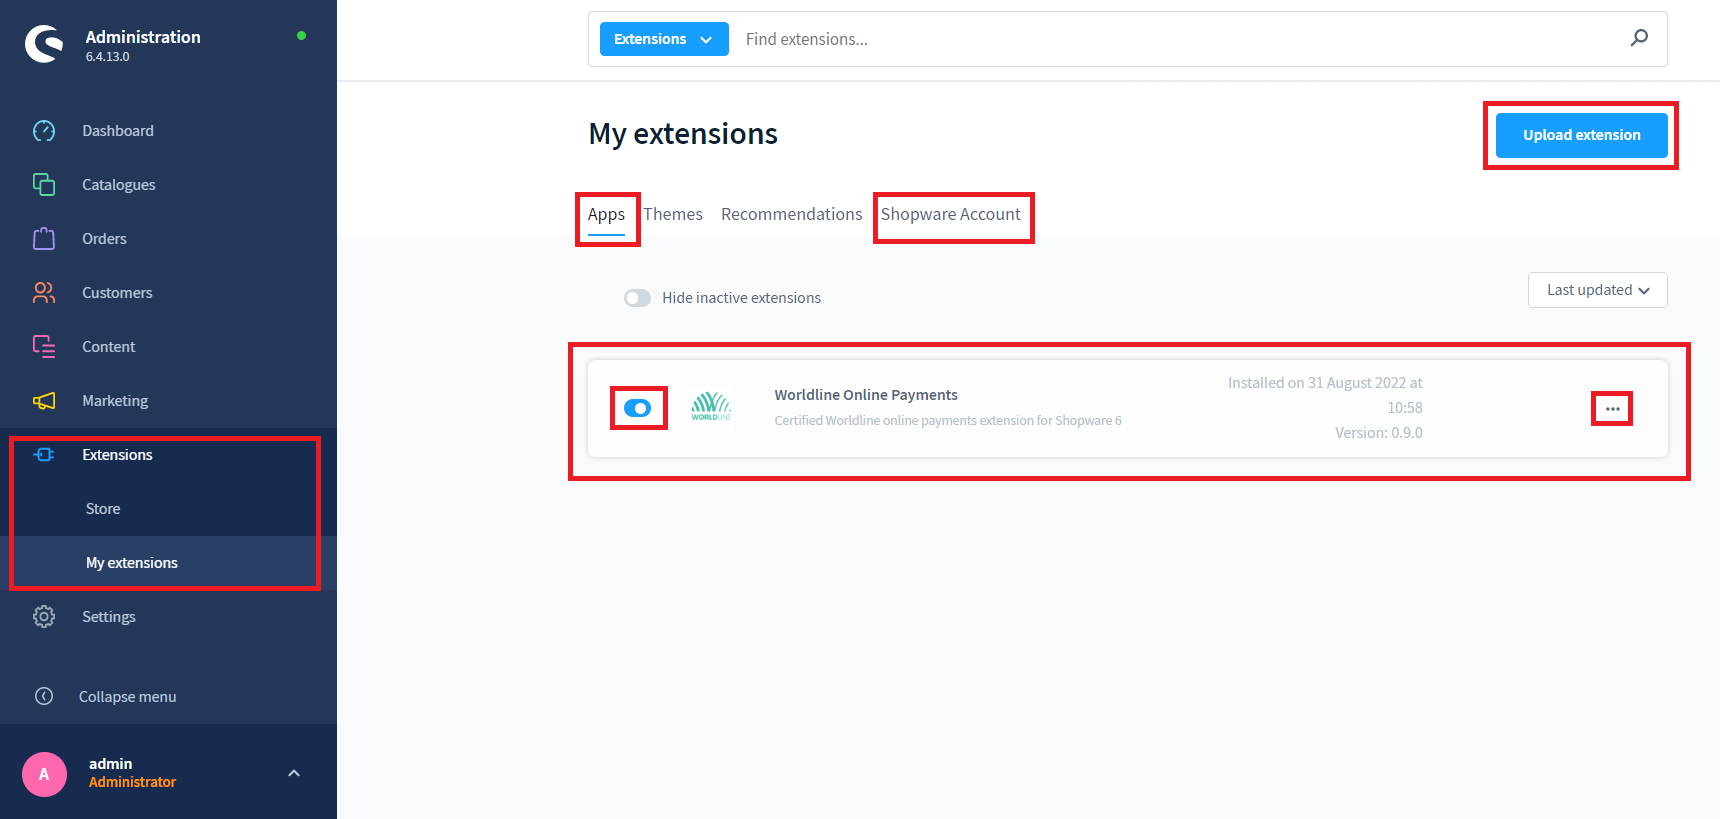
- Go to: Extensions - My extensions - Apps - Upload extension / or install the plugin via your Shopware Account
- Click the button Install the app.
Plugin Activation
Being in the My extensions - App directory activate the plugin by clicking the switch-on button.
Plugin Configuration
To configure the plugin, click on "..." - Configuration
There you will see the following configuration fields:

- Live merchant Id: Your Worldline merchant ID
- Live API Key: Your Worldline API Key, configured in the Worldline backoffice, see Worldline Backoffice Configuration
- Live API Secret: Your Worldline API Secret, configured in the Worldline backoffice, see Worldline Backoffice Configuration
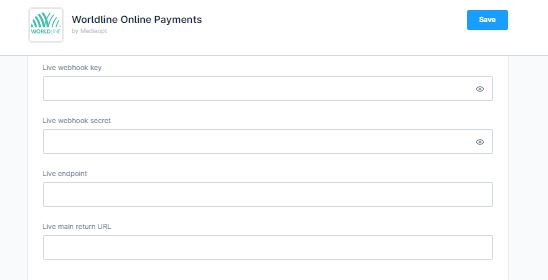
- Live webhook key: Your webhook key, configured in the Worldline backoffice, see Worldline Backoffice Configuration
- Live webhook secret: Your webhook secret, configured in the Worldline backoffice, see Worldline Backoffice Configuration
- Live endpoint: host for the live endpoint that your Worldline/Ingenico account provides
- Live main return URL: URL to be called when finalizing transaction. This URL is only needed to create the order and the payment in the admin panel, after the order is finalised, the customer does not necessarily return to this page (this depends on the storefront).
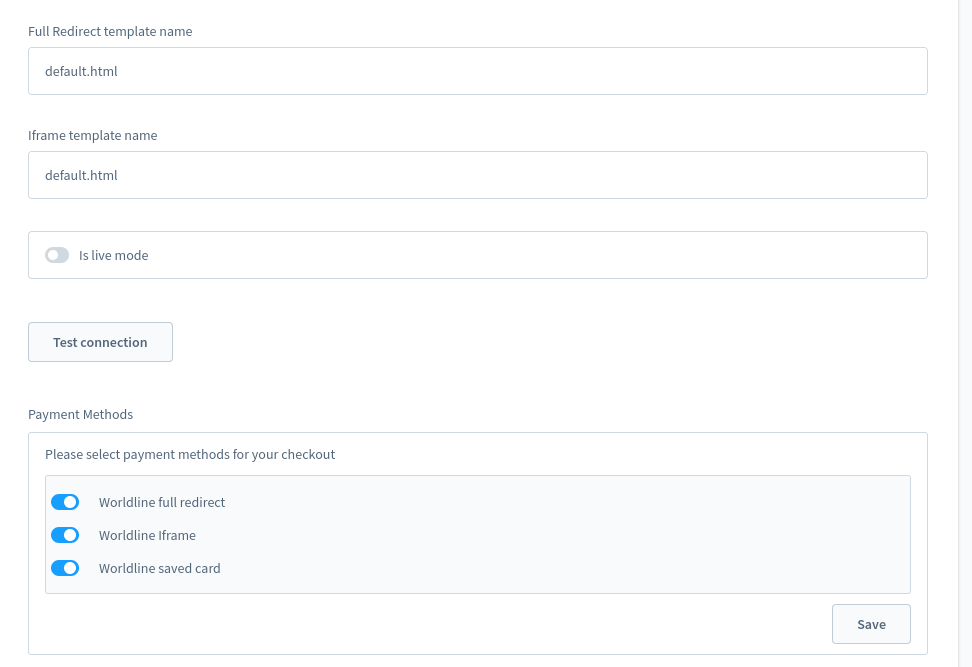
- Full redirect template name: a name for the template you wish to use with the full redirect method. It must be uploaded in your Worldline account, the plugin will refer to it by the name.
- Iframe template name: a name for the template you wish to use with the Iframe. It must be uploaded in your Worldline account, the plugin will refer to it by the name.
- is live mode: switch between live and test mode
- Test connection: test your API connection
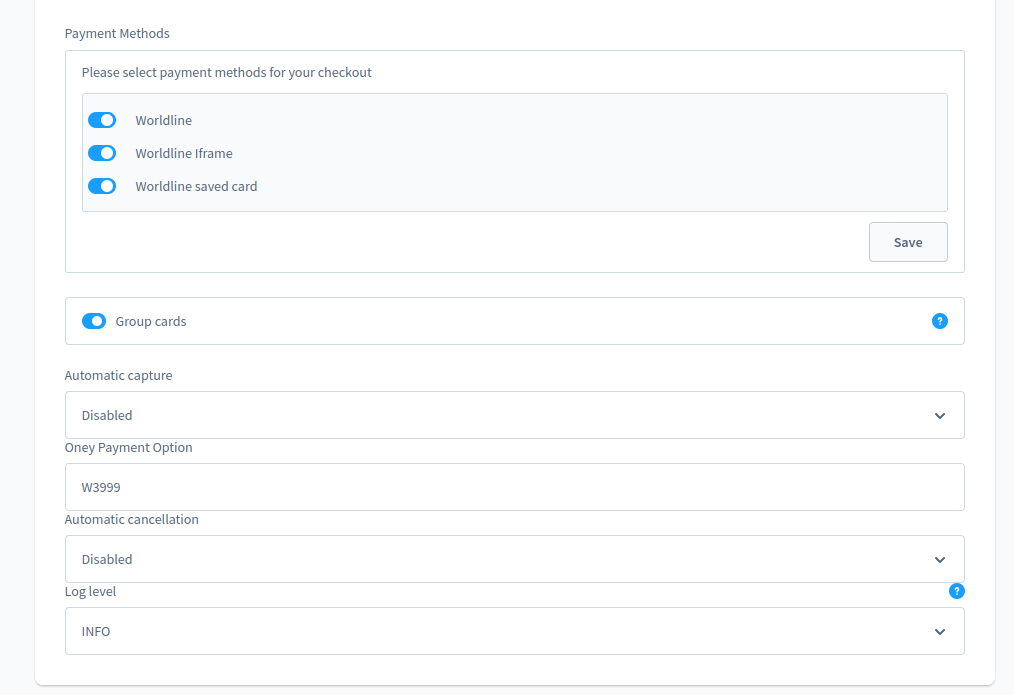
- Payment methods: after choosing a channel, you will see a list of all payment methods that you have activated in your Worldline Backoffice. Default setting is full redirect, iframe and card tokens for all channels.
- Group cards: if you activate this setting, all cards payment methods in the full redirect will be grouped as a single payment method.
- Automatic Capture: cronjob configuration, it will look for the orders made in space of the specified time (not at all, immediately, 1 day, etc) and capture their payments. Direct sales are available under "Immediately".
- Oney payment option: if you need to use the option W3999, you can type it in here.
- Automatic Cancellation: cronjob configuration, it will look for the orders with the Worldline transaction status 0 (Created) and 46 (Redirected) and set their order status to "Cancelled". 0 and 46 appear when a customer closed the payment page and did not try to complete the payment later on.
- Log level: choose between DEBUG, INFO and ERROR.
Payment methods configuration 
Now you need to activate your payment methods for your shop (channel). Default setting is that the full redirect method is activated for all channels. Each channel should be configured separately. As soon as you go to a specific channel, you will see a list of available single-payment methods, loaded through the API connection to your Worldline account - see below an example. Activate your preferred payment methods and click "Save".
Note that once you activated a payment method here, you don't have to assign this payment method to a channel manually, the plugin does it for you - this also applies to deactivation.

Here, Worldline full redirect refers to a hosted checkout page, containing all Worldline payment methods. Worldline Iframe is a hosted tokenization page (a client must enter his credit card details in a loaded iFrame).
Worldline saved card refers to activated or deactivated card tokenization (see below).
All other payment methods refer to the hosted checkout page, but for each method separately.
Note that you can rename the payment methods in the way you like.
Both for the hosted checkout and hosted tokenization the used card tokens are being saved as long as "Save card" checkbox has been checked by the customer:
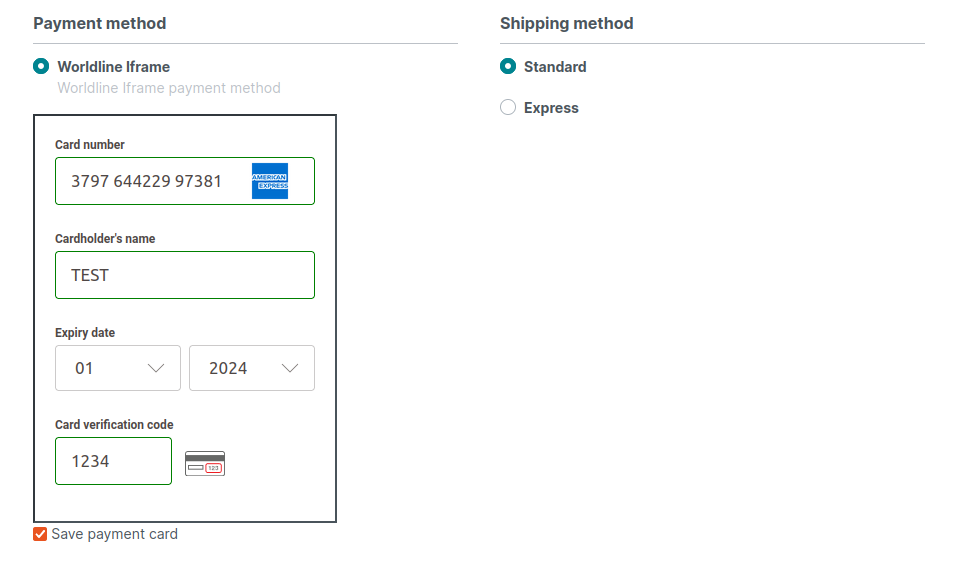
so that upon a following order they appear as ready-to-choose payment methods:
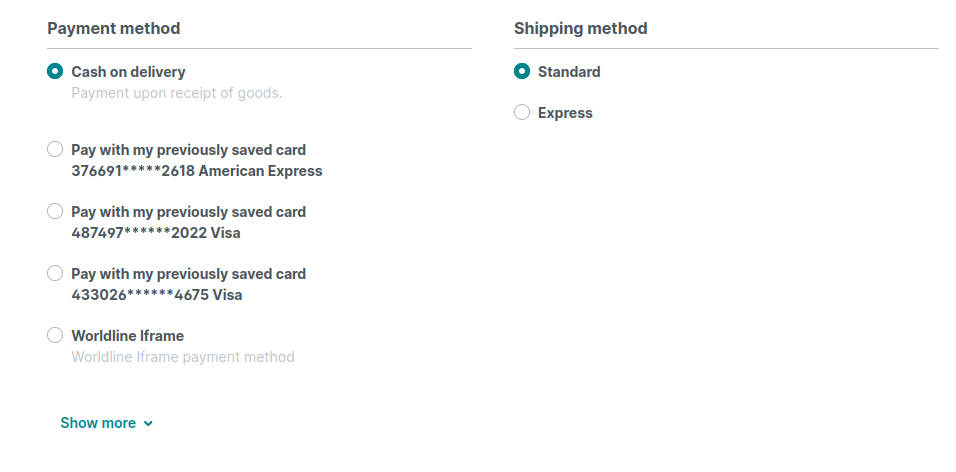
They can then be used interchangeably with Iframe and Full redirect. These tokens can also be deleted in the customer account area. Delete operation in the shop also deletes them on Worldline side.
Note that the tokens refer to a plugin payment method Worldline saved card:

Please keep it active if you wish to use it in your shop.
Now Worldline plugin is ready to be used by your shop clients.
Worldline Transactions Management
Worldline plugin allows you to check, partially capture, refund and cancel transactions directly from your Backend. The partial operations can be done either itemwise, amountwise, or mixed. For each operation done you can see its status in the payment log. To get the up-to-date information, click on "Check status".
We describe at first how to conduct partial operations itemwise.
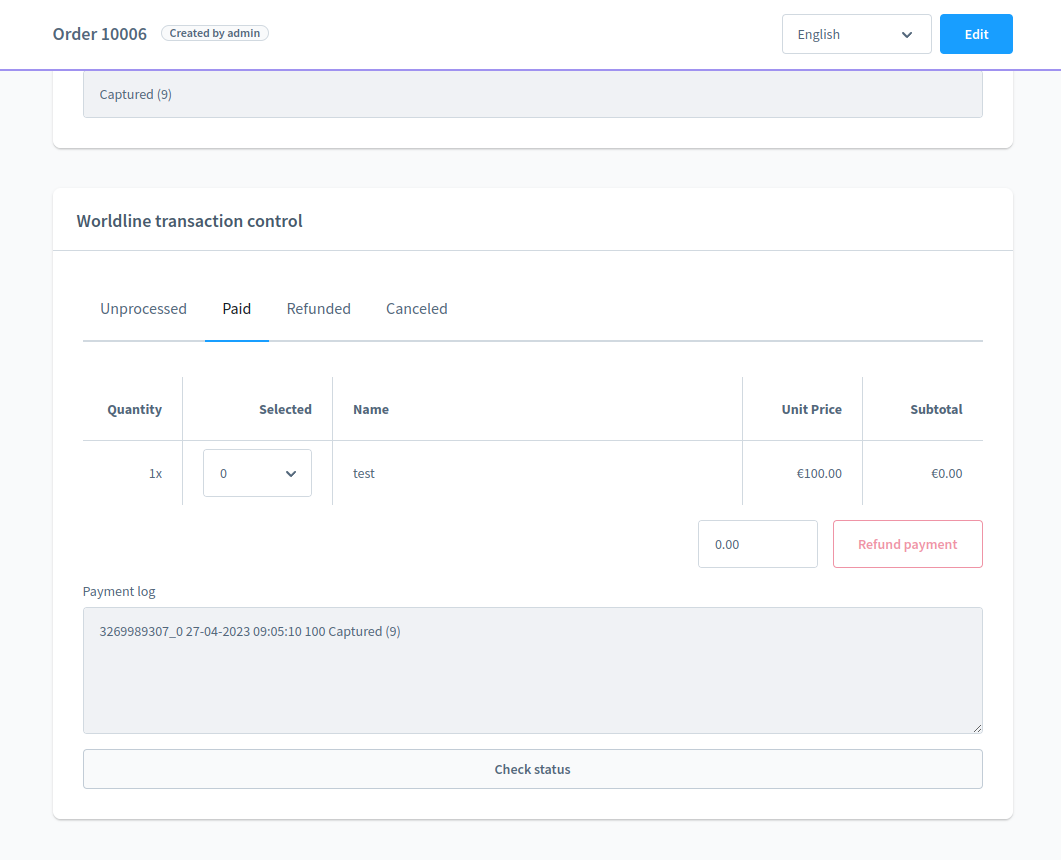
Go to an order and at the end of the page you will find the Worldline transaction control:
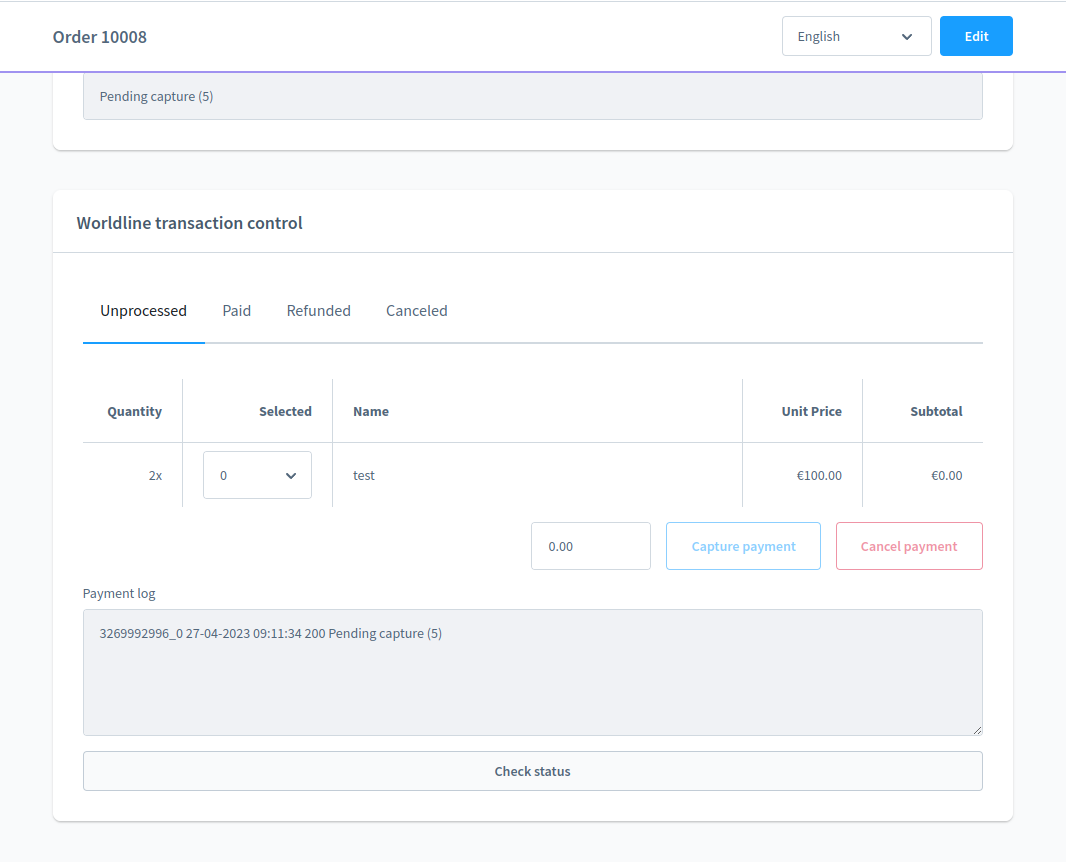
Depending on the transaction mode (direct sales/authorization), you will see either "Captured" or "Pending capture".
If you wish to completely capture the order, choose all items in complete quantity (in the case above quantity is 2). In the amount field near the button "Capture" you will see the full amount. Now click "Capture". The payment was captured.
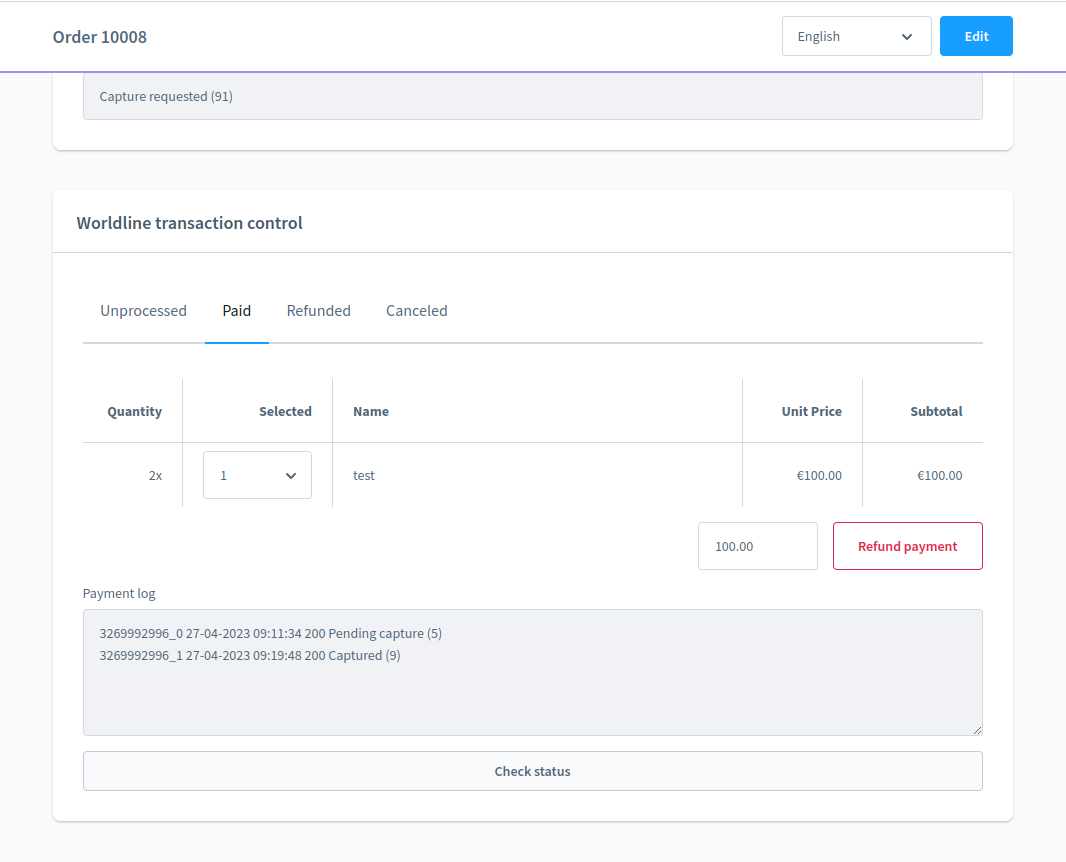
If you wish to capture only certain items in certain quantity, choose these items in this quantity and click "Capture". Only the amont, corresponding to the chosen items, will be captured. The captured items will be moved to the "paid" tab.
The same applies to the "Cancel" button, and the cancelled items are moved to the "cancelled" tab. Note: Klarna payment method does not support partial cancellation.
After you captured some items, they are available for refund in the same quantity as you captured them:
Now you can do (partial) refund in the same way as for "Capture" and "Cancel". The refunded items are moved to the "refunded" tab.
Further we describe how to conduct partial operations amountwise.
To achieve this, simply do not choose any items and operate directly the amount field near the "Capture" and "Cancel" buttons, in the example below an amount of 70 was entered instead of default 100:

Note that it is not possible to enter a sum, exceeding the order amount. Now click "Capture", and the payment was processed:
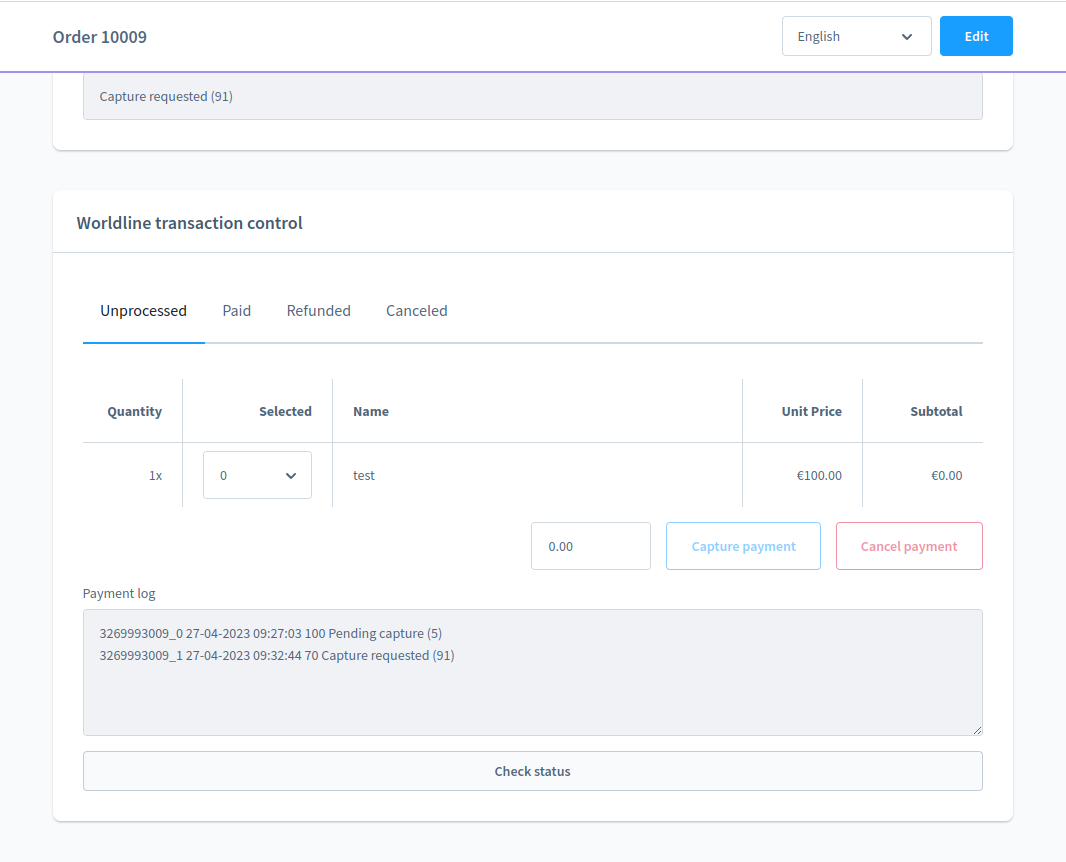
The same applies to cancelling and refunding payments.
You can also do mixed partial operations: there you just combine itemwise and amountwise, and capture/cancel/refund for chosen items an amount that you want to capture/cancel/refund. Note that you are responsible for choosing an appropriate strategy for your case.
Thus, Worldline transaction control provides a very flexible tool for partial transactions operation.
Cronjobs (Automatic Cancellation and Capture)
The following description refers to the usual procedure of running cronjobs in your Shopware shop.
Usually scheduled tasks are registered when installing or updating your plugin. If you don't want to reinstall your plugin in order to register your scheduled task, you can also use the following command to achieve this: bin/console scheduled-task:register
In order to properly test your scheduled task, you first have to run the command bin/console scheduled-task:run. This will start the ScheduledTaskRunner, which takes care of your scheduled tasks and their respective timings. It will dispatch a message to the message bus once your scheduled task's interval is due.
Now you still need to run the command bin/console messenger:consume to actually execute the dispatched messages. Make sure, that the status of your scheduled task is set to scheduled in the scheduled_task table, otherwise it won't be executed. This is not necessary, when you're using the admin worker.
MOTO (Mail Order Telefone Order)
Worldline Plugin supports creating MOTO orders, i.e. orders that are given either per email or via telefone, so that payment credentials are given to the shop manager directly and he executes the payment himself, operating in the shop admin panel.
Here we describe how you can conduct a payment for a MOTO order:
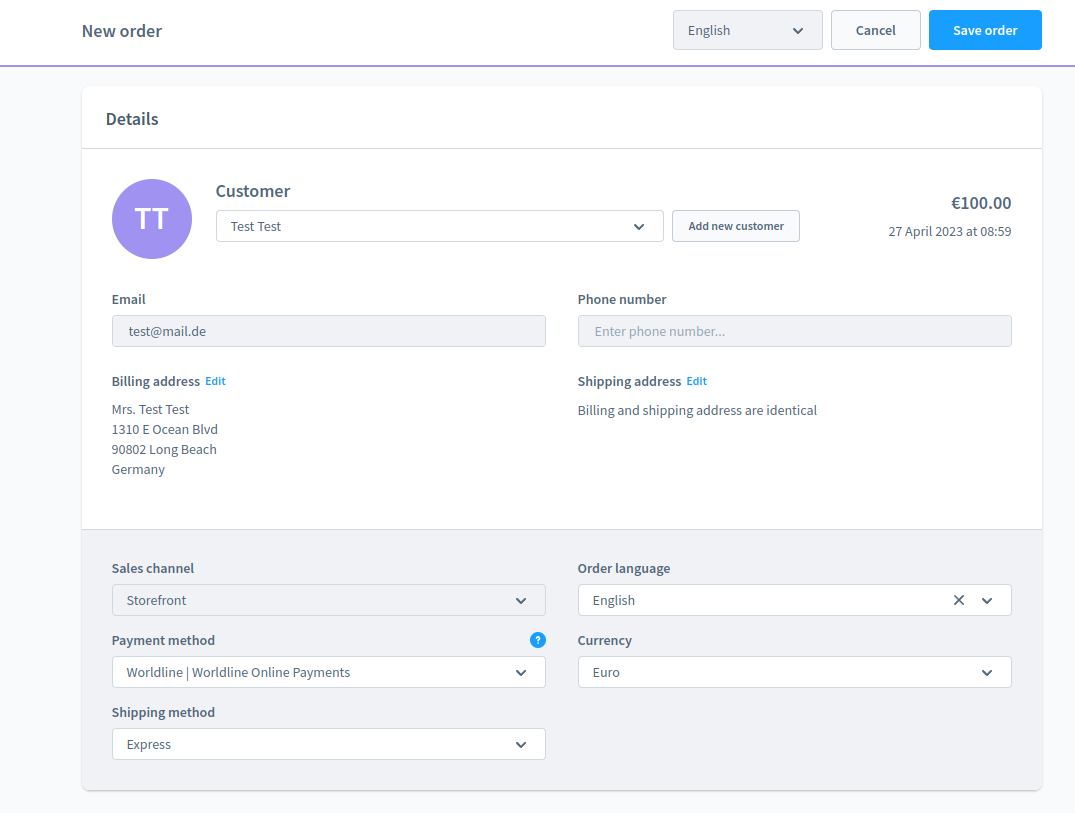
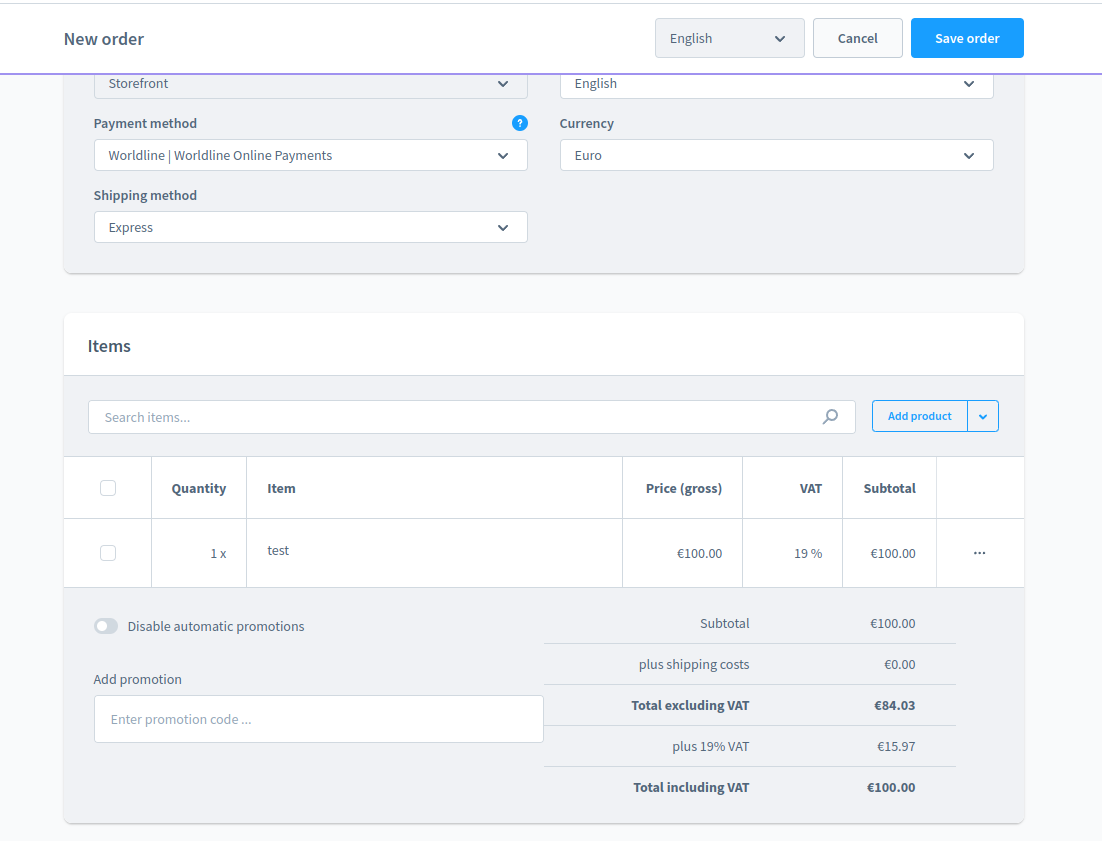
You start with creating an order via shopware admin panel (Orders -> Add order).
Then you fill out all customer and order items relevant information and choose "Worldline" (Worldline full redirect) payment method as payment method for this order:
Now save the order and open it again, now at the bottom of the order page you can see the Worldline transaction control with "pay for order" button:

If you click on it, you are sent to the Worldline hosted checkout page. Conduct a payment and go back to the order page, now you can see the usual Worldline transaction control:
Now the payment was made, and you can process your MOTO order further with full support of partial operations.
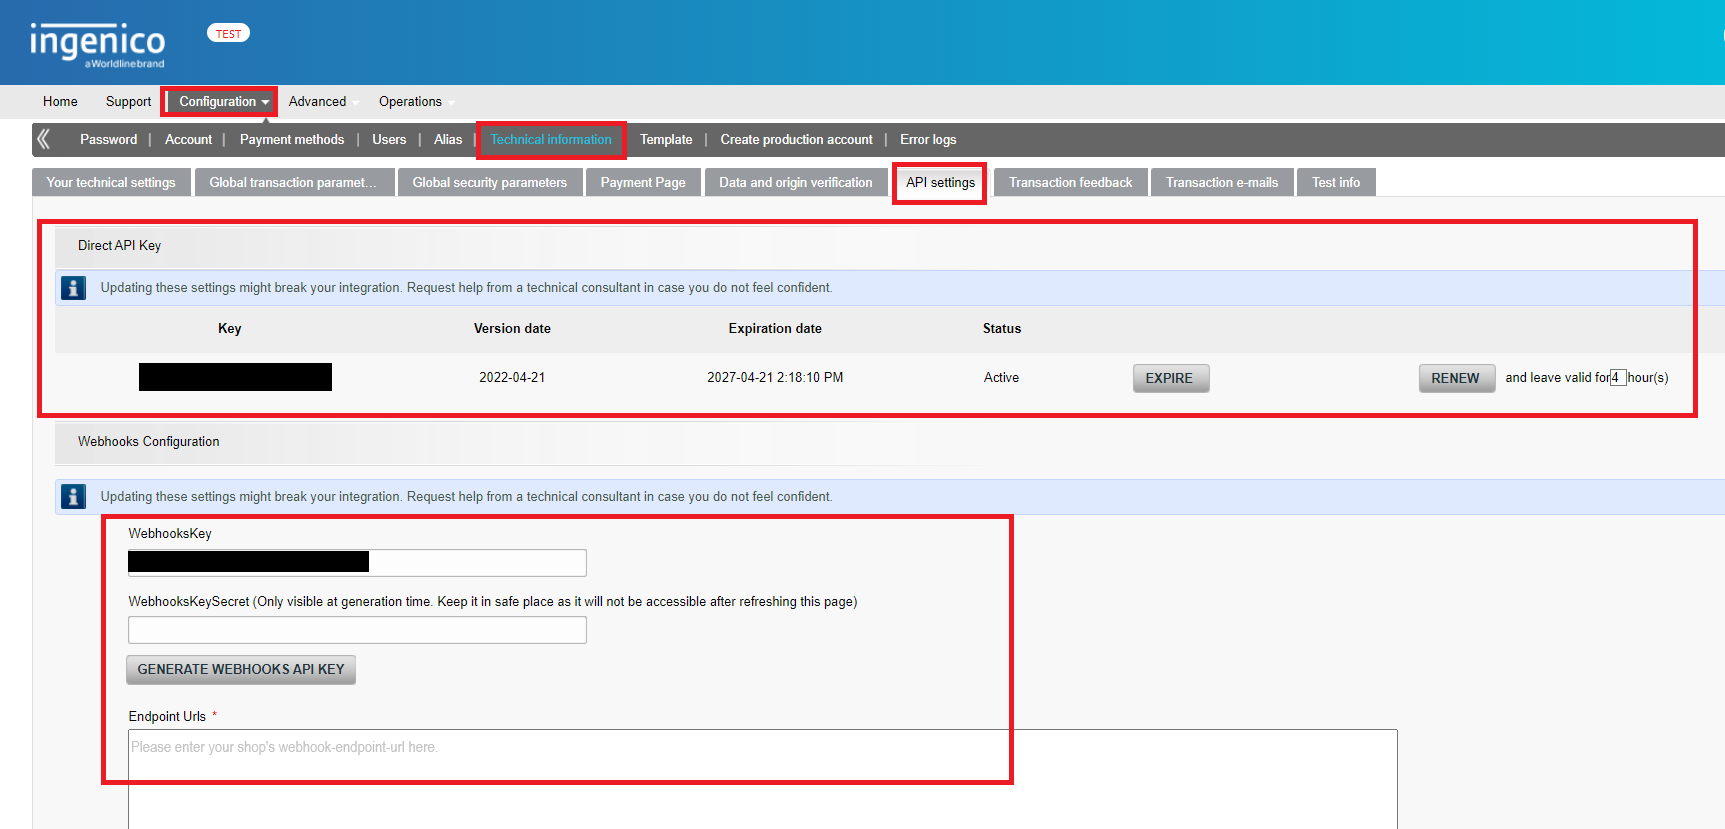
Worldline Backoffice configuration
In your Worldline/Ingenico Backoffice, go to Configuration - Technical Information - API Settings: create an API Key, which you will need to enter in your Shopware Backend configuration.
For configuration of the webhook, create a webhook Key, and enter your webhook endpoint URL in the form: http://YOUR_SHOP_URL/worldline/payment/webhook
Support
Please contact support@mediaopt.de if you are dealing with any issues/bugs. We will help you as quickly as possible.