Avalara Plugin für Shopware 6
User Manual
Shopware versions: From 6.4.8.0 – 6.4.10.0
Module Language : english
PHP version : 7 or greater
More information for Avalara: http://www.avalara.com/
This manual shows you step by step how to install the plugin to your online shop. Please test the installation and the configuration of the plugin on a test system before installing it on your live shop.
- Inhaltsverzeichnis
- Avalara Plugin für Shopware 6
- User Manual
The Plugin
The Avalara Shopware Plugin enables an easy handling of exporting products to countries like Canada and the USA. The USA is known for an unclear tax system. So Avalara is taking over the accounting of taxes. The Plugin connects your Shopware Shop with Avalara. For each transaction to selected countries, the customers of your shop will get a runtime tax-result for their current order. After an Ordering the data and the tax-result will be transmitted to Avalara and Avalara will report the taxes to the corresponding government.
The module offers a multitude of settings to adapt your products to each tax-system.
Our Support
If you have questions concerning your AvaTax Account, pricing, tax calculation, or need help by setting up your Avalara Account please contact Avalara: https://www.avalara.com/us/en/index.html
If you need help while using our plugin, please contact support@mediaopt.de. Please understand that you will be charged for our support according to our support contract rules, where support includes plugin onboarding and custom updates.
Plugin installation
Before you begin with the installation process, backup your database and your online shop. If you have concerns about installing the Plugin, let this job be done by a professional, or feel free to contact us for help. Please, follow this instruction carefully for an undisturbed use.
Install and activate via Shopware Admin
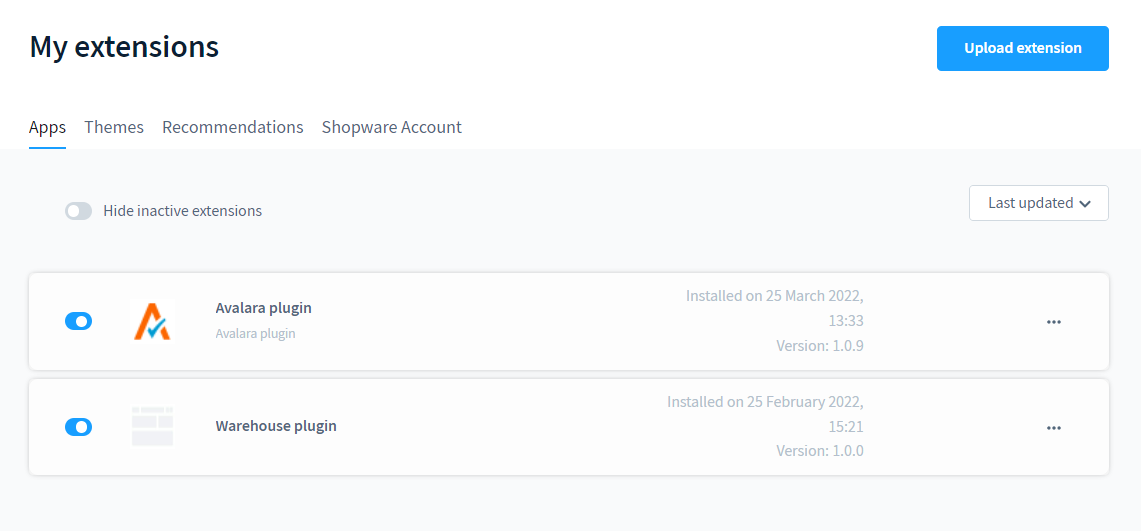
- Log in to your shop backend.
- Go to: Extensions > My extensions.
- Click the button Upload extension.
- Choose a zip-archive with the plug-in and upload it.
- Click Install.
Plugin Activation
Click switch-on button on the left. Configure the Plugin in Extensions > My extensions by clicking on "..." and Configuration.
Fill in your credentials, edit your configuration, enter your origin address and save the Plugin settings.
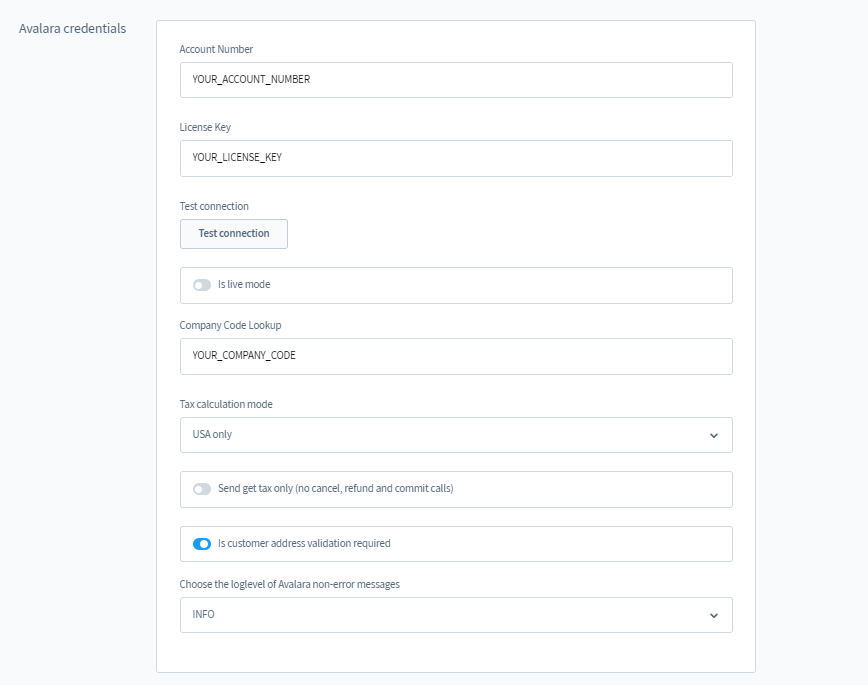
Credentials:
- Live mode: Choose between working in live or test operation
- Account number: Fill in an account name for your Avalara account
- License key: Fill in a passwort for your Avalara account
- Company code: Fill in a company code you used in the Avalara admin console
- Tax caluclation mode: USA / USA & Canada / No validation
- Send get tax only: Only taxes are fetched, but no other calls (commits, etc.) are being made
- Address Validation: Yes / No
- Test connection: Validate your credentials
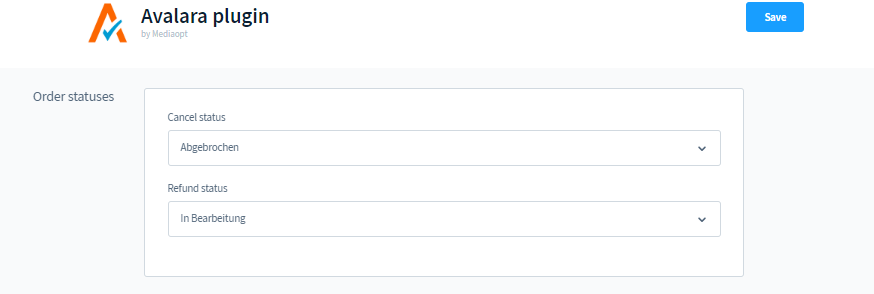
Order status:
- Cancel Status: which Shopware status would trigger cancelling on AvaTax.
- Refund Status: which Shopware status would trigger refunding on AvaTax.
Note that if you wish to have more order statuses (like refund) they must be implemented separately by your developer team, see here: https://docs.shopware.com/en/shopware-6-en/tutorials-and-faq/create-new-order-and-payment-status
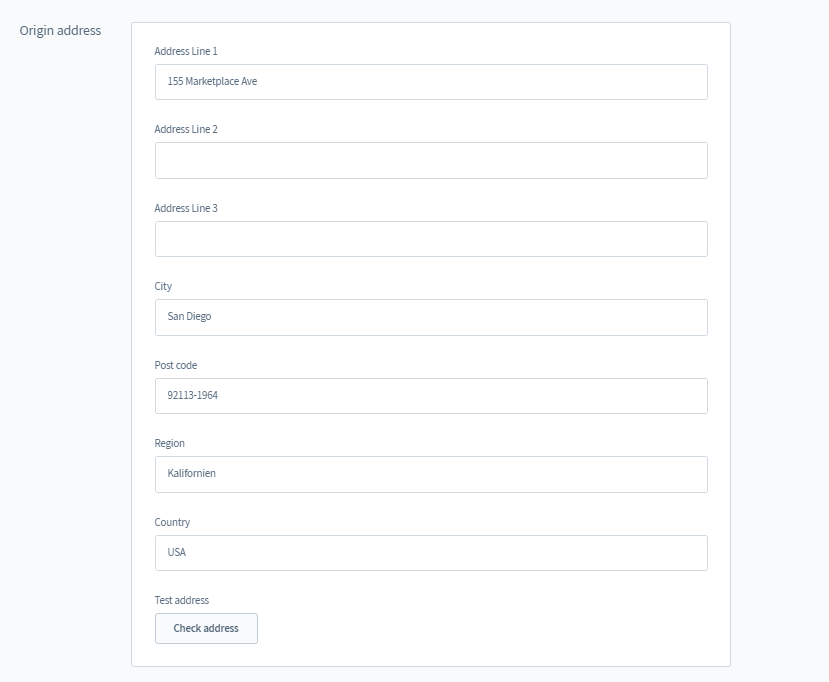
Origin address:
Fill in your business address data of your concern. Note: if you have a warehouse plugin, then for each article you can specify own origin address that would be used by our Avalara plugin. Wenn not specified, the one in the Avalara configuration will be used.
Check address: check the validity of the origin address
Don't forget to save the configuration.
Logfile
The log file will be created on a first logged event depending on a chosen log level:
- For the log level Error only errors will be logged.
- For the log level Info each Avalara call will be reported to the logfile.
- For the log level Debug some additional debug information will alse be reported to the file.
Plugin Configuration
Avalara has to identify the tax rates for a specific product with Avalara Taxcode which precisely identify the correct tax for a class of products.
To find the correct Taxcode, use Avalara taxcode finder: http://taxcode.avatax.avalara.com/.
Notice: There is a default taxcode, if the sold product is not linked to a taxcode
Article Taxcode
You can upload your articles database to AvaTax with the Avalara taxcodes assigned to the Shopware Product-ID, this ID will be sent by the plug-in when requesting Avalara tax calculation.
Or you can type a corresponding tax code either in Catalogues -> Products -> Product -> Specifications -> Customer fields -> Product Tax Code:

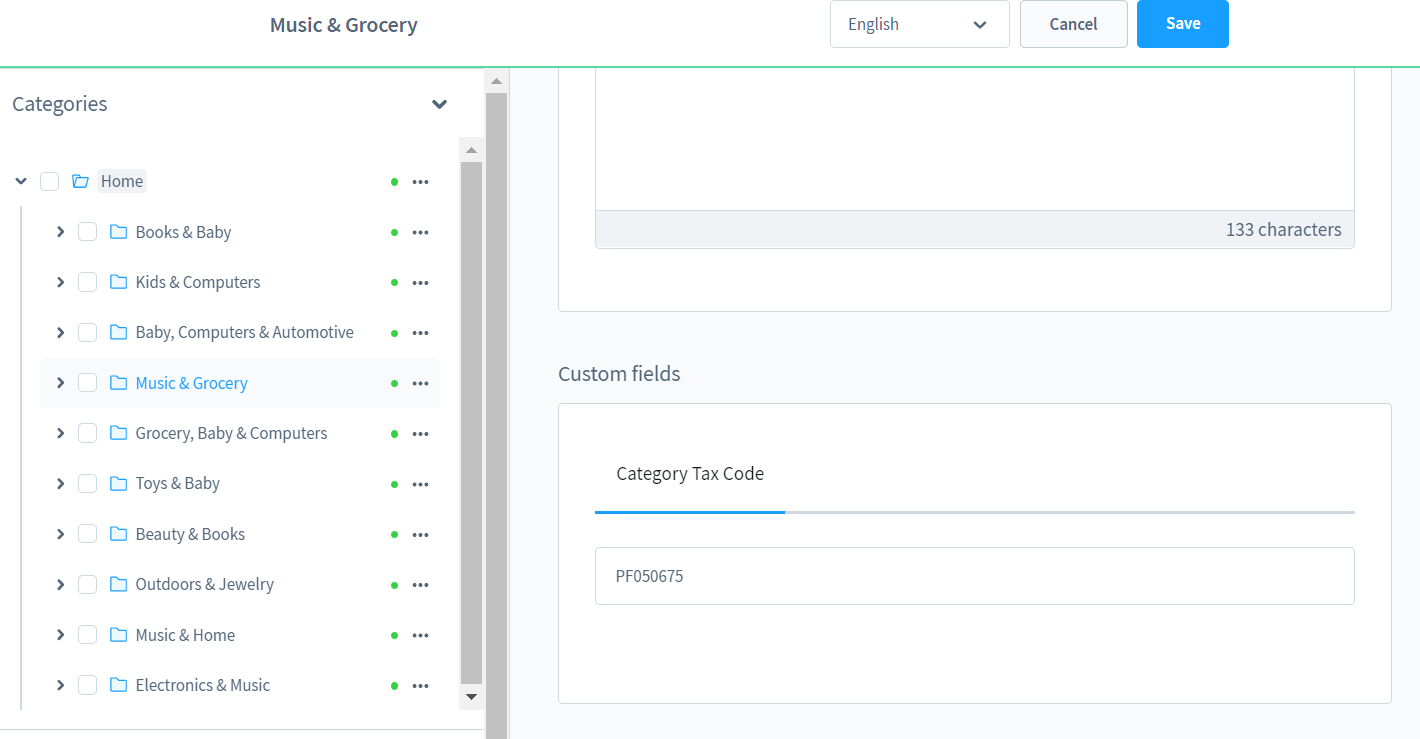
or in Catalogues -> Categories -> Category -> Custom fields -> Category Tax Code for Category Tax configuration.
Shipping Taxcode and other options
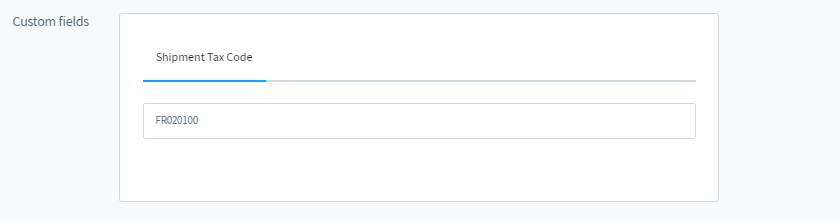
Dispatching goods in several ways can also change the taxe rates. So you can insert a Taxcode for shipping: Settings - Shipping - Shipping Method - Custom fields: Shipment Tax Code.
A default value is "FR010000".
Net prices configuration
Please note that the correct way to configure net prices in your shop is via customer groups:
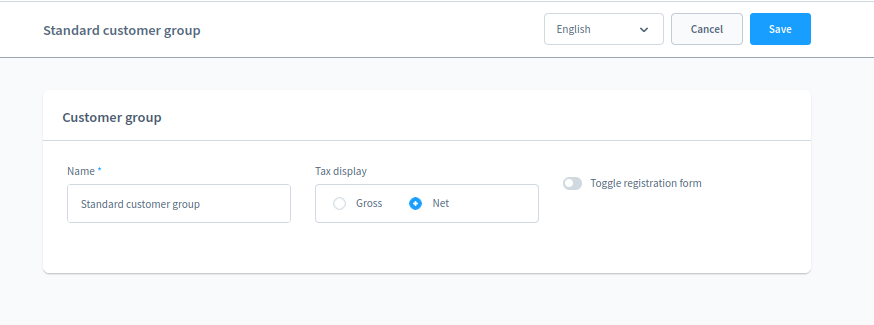
If you desire to have net prices in your shop channel, please select tax display - Net.
It is incorrect to set the option "Tax free B2C" to active for the US or Canada in order to achieve this objective, unless you explicitly wish to have no taxes added to the final amount. The plugin is listening to the customer group configuration, and this is a correct behavior.
Please always check you customer group tax configuration if you have questions to how taxes are calculated by the plugin in your shop channel with this customer group.
Vouchers
Note that if you have a discount, that discount is split across all the items in the order according to their contribution to the total price. The tax is then applied to each discounted item.
Please remember: if you have net prices in your sales channel, the customer group, assigned to your voucher (e.g. Club members) must also have net tax calculation activated, or else the tax calculated on a discounted item will be included (gross).
After Sale Features
Please note: the tax will not be recalculated after adding a new address in the administration. So if you need to change an address of some client, cancel the order first, and ask the client to make it anew.
To handle committing, cancelation or changing an order, the Avalara Plugin offers following features:
Order committing
Happens automatically, once you submit order.
Note that unless there is a positive answer from Avalara, the order will not be commited. It does not apply to the orders where the AvaTax calculation was not triggered.
Order cancellation
If you change an order status to the one specified in the Avalara Configuration for "Cancel Tax" operation, cancelling will be triggered.
Refunds
If you change an order status to the one specified in the Avalara Configuration for "Refund" operation, refunding will be triggered.
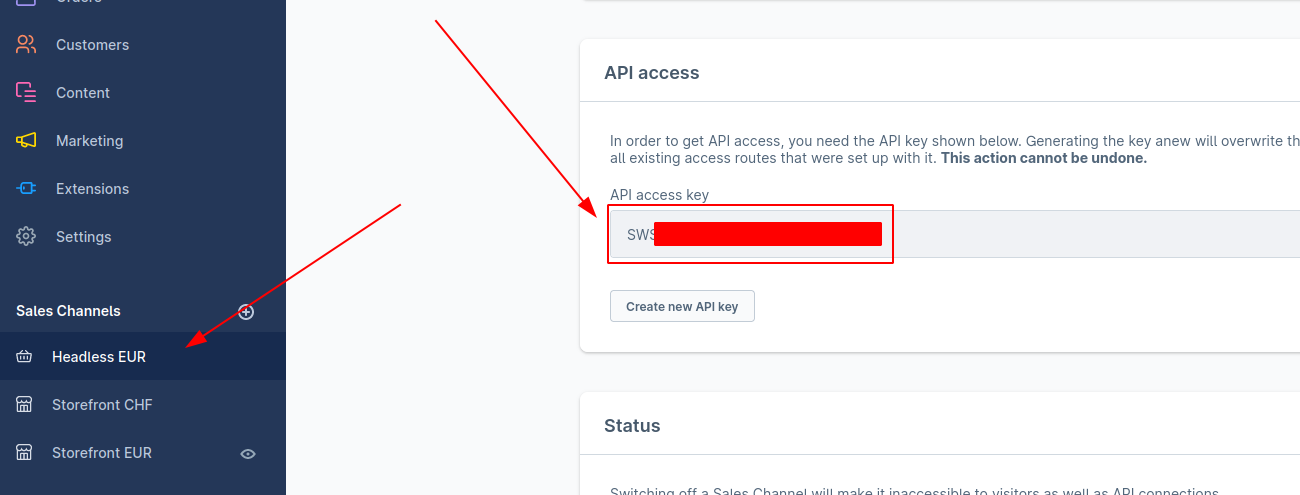
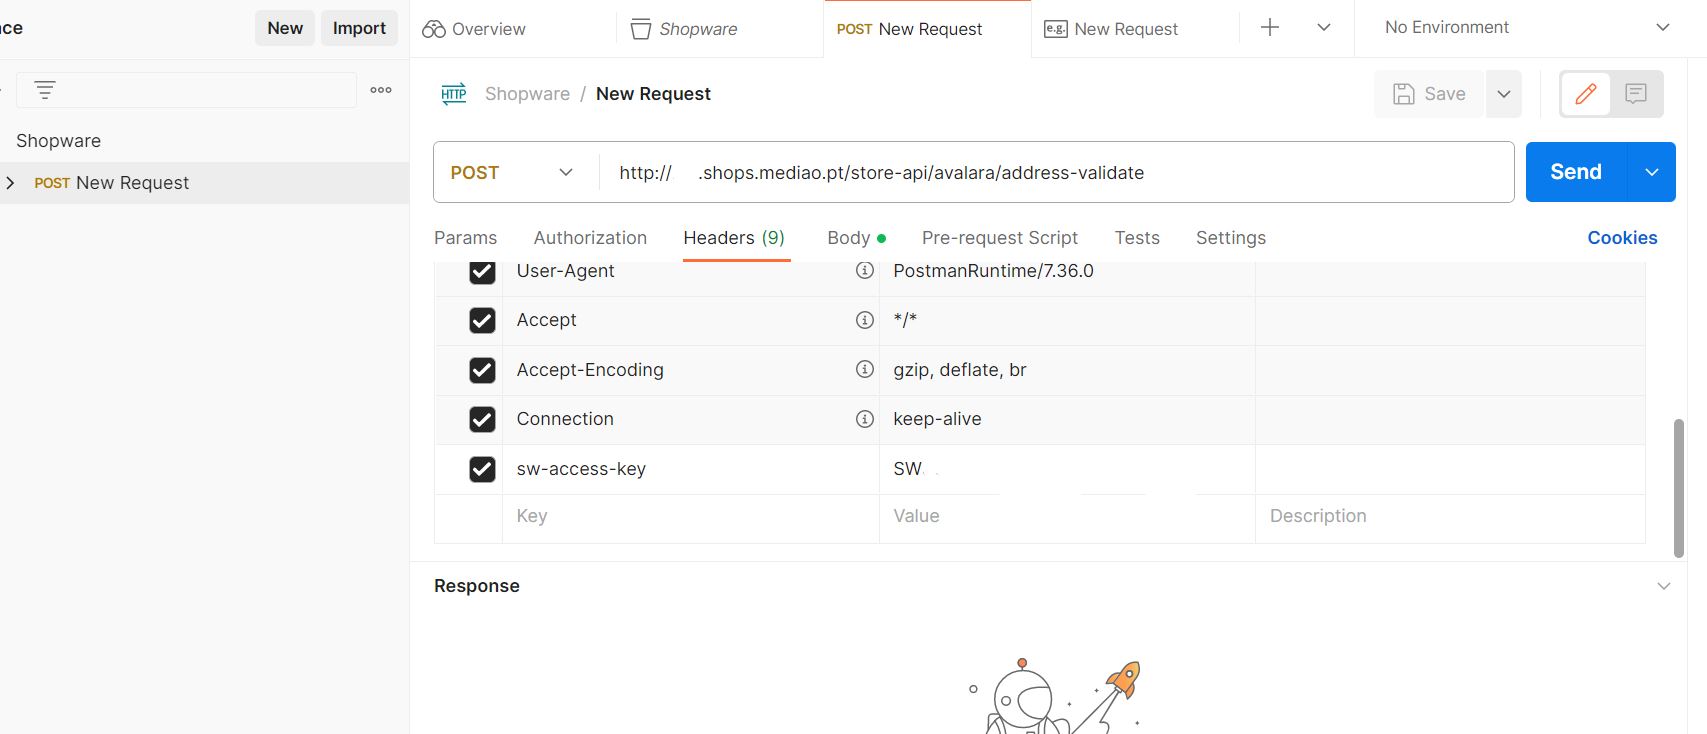
Address validation - Headless
To ensure correct address validation in headless stores, you need an external API provider. To get your API access key, check the settings in the sales channel.
Open your external API provider and add a new header as seen in the screenshot below.
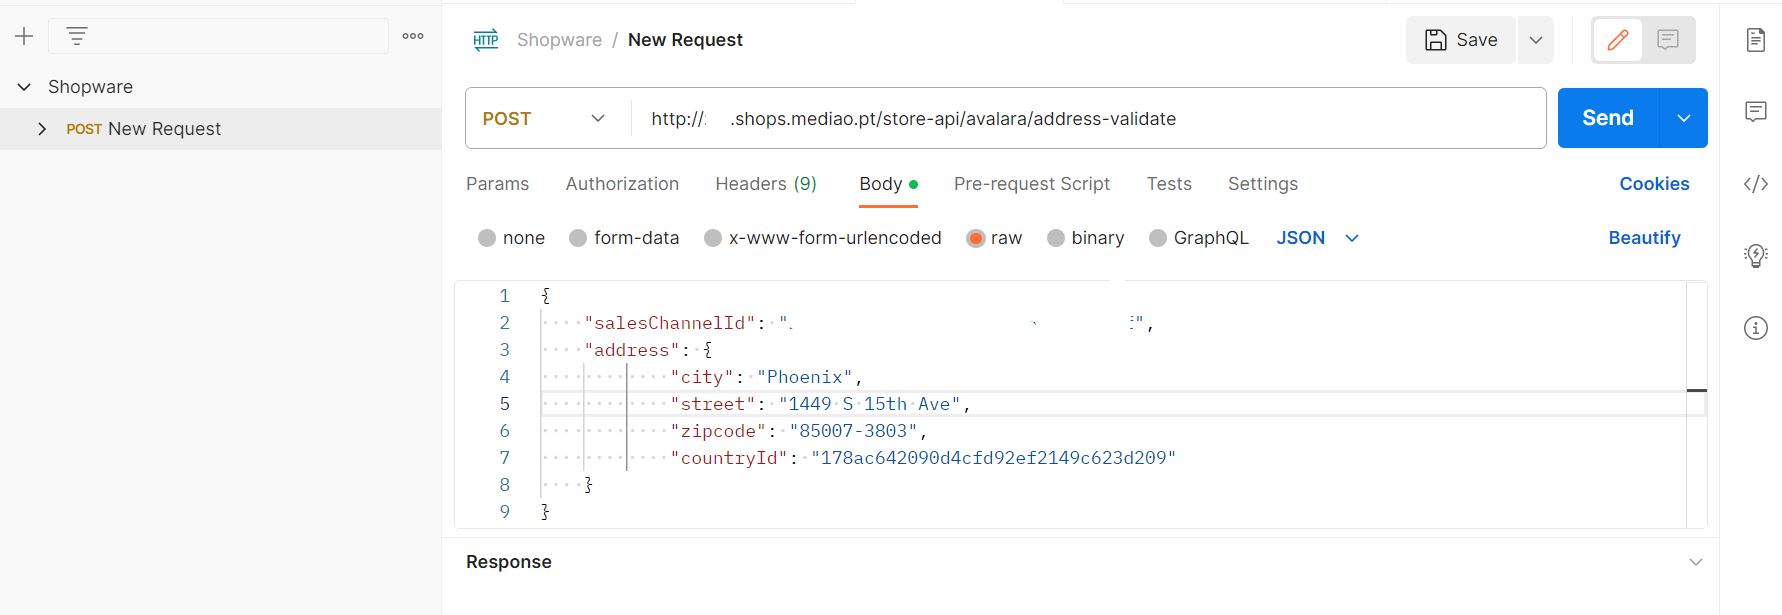
{
"salesChannelId": "id",
"address": {
"city": "Phoenix",
"street": "1449 S 15th Ave",
"zipcode": "85007-3803",
"countryId": "178ac642090d4cfd92ef2149c623d209"
}
}
The code above will test the validity of the address. Please enter your store link as shown in the screenhot above before testing.
FAQ
Avalara is not calculating tax at all - Please make sure that you have not implemented a rule regarding tax calculation/set a product as exempt from taxes/set an amount after which there is no tax for your order.
Avalara is calculating a wrong amount of taxes - Please make sure you have line by line tax calculation enabled in your storefront.